
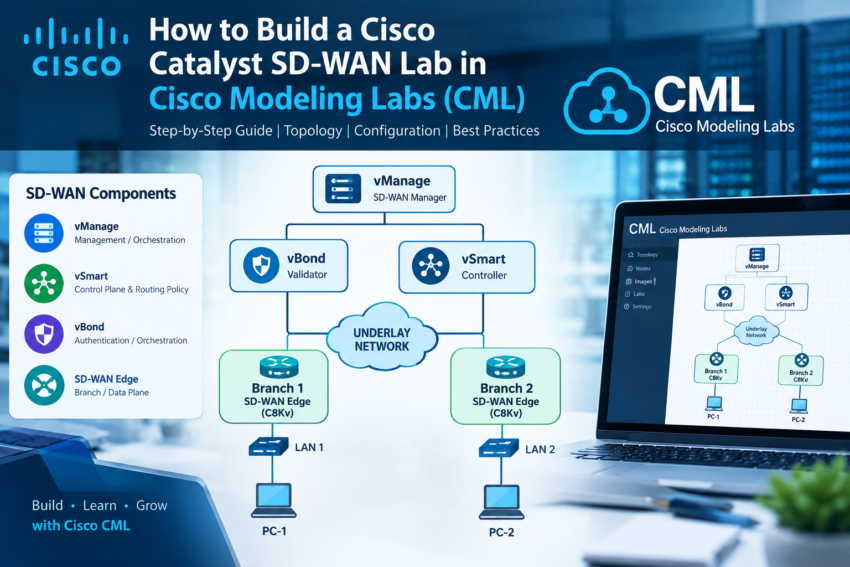
How to Build SD-WAN in CML2: Step-by-Step Cisco SD-WAN Lab Guide
If you are learning Cisco SD-WAN then you may ask how to build SD-WAN in CML2. Cisco Modeling Labs 2 (CML2) provides a virtual environment where you can create and test a Cisco SD-WAN topology without using a large physical lab.
Cisco CML provides specific Catalyst SD-WAN images for building an S00000000000000000000000000000000000000000000000000000000000000000000000000000000000000000000000000000 D -WAN fabric. Available node types include SD-WAN Manager. SD-WAN Controller. See SD-WAN Validator. SD-WAN Edge and other Edge node types.
In this guide you will learn how to build SD-WAN in CML2 step by step. You will also learn about the main SD-WAN components and how Cisco SD-WAN works. In addition you will learn what to check when your lab does not come online.
Note: Cisco has renamed several SD-WAN components. Manage is now called Cisco Catalyst SD-WAN Manager. Smart is now called SD-WAN Controller. Bond is now called SD-WAN Validator. Older guides may still use the previous names.
What Is SD-WAN?
SD-WAN stands for Software-Defined Wide Area Network. It is a network architecture that uses software and centralized control to manage WAN connections.
Traditional WAN networks often require engineers to configure routers one by one. SD-WAN uses a different approach. The architecture separates management. Control. And data functions.
Cisco Catalyst SD-WAN uses different planes for orchestration. Management. Control. And data forwarding. These components work together to create and manage the SD-WAN overlay.
Therefore an SD-WAN lab in CML2 is useful for learning these concepts in a virtual environment.
Why Build SD-WAN in CML2?
CML2 is useful for learning because it lets you create network topologies with virtual Cisco devices. You can test configurations. Routing. Policies. Connectivity. And troubleshooting without using physical routers.
A basic SD-WAN lab can help you understand:
- SD-WAN architecture
- SD-WAN Manager
- SD-WAN Controller
- SD-WAN Validator
- SD-WAN Edge routers
- Overlay Management Protocol (OMP)
- WAN connections
- IPsec tunnels
- Routing
- Centralized policies
- Device onboarding
- SD-WAN troubleshooting
In addition Cisco CML provides Catalyst SD-WAN nodes that can be used to build an SD-WAN fabric.
How to Build SD-WAN in CML2 Step by Step
Before you start make sure that your CML2 installation is working. Also check that the required SD-WAN images are available.
The exact images and resource requirements depend on the CML version and software release. Therefore always check the documentation for the version you are using.
For example CML documentation provides dedicated SD-WAN Manager. Controller. Validator. And Edge images.
Step 1: Prepare Your CML2 Environment for SD-WAN
First log in to your CML2 installation.
Next check that the required SD-WAN images are available in your node list.
For a basic lab you can start with:
- 1 SD-WAN Manager
- 1 SD-WAN Controller
- 1 SD-WAN Validator
- 2 SD-WAN Edge routers
- Optional LAN routers or switches
For your first lab keep the topology small. Later you can add more branches after the basic fabric is working.
A simple design can include a Manager for management. A Controller for control functions. A Validator for orchestration. And two Edge routers for Branch A and Branch B.
Step 2: Add SD-WAN Nodes in CML2
Now create a new lab in CML2.
Add the following nodes:
- SD-WAN Manager
- SOFTWARE-DEFINED WIDE AREA NETWORK Controller
- SOFTWARE-DEFINED WIDE AREA NETWORK Validator
- SD-WAN Edge 1
- SD-WAN Edge 2
Next connect the nodes according to your planned topology.
The current CML SD-WAN feature set includes the images needed for the Manager. Controller. Validator. And Edge parts of the architecture.
At this stage focus on creating a clean topology. Avoid adding too many devices until the basic lab works.
Step 3: Build the SD-WAN Underlay Network
Before the SD-WAN overlay can work your devices need IP connectivity through the underlay network.
The underlay is the basic IP network below the SD-WAN overlay.
For a simple lab you can create a basic IP design.https://technytime.com/
For example:
| DeviceInterfaceExample IP | ||
|---|---|---|
| Validator | WAN | 10.0.0.10/24 |
| Controller | WAN | 10.0.0.20/24 |
| Edge 1 | WAN | 10.0.0.101/24 |
| Edge 2 | WAN | 10.0.0.102/24 |
These addresses are only examples. Use addresses that match your own CML topology.
Before moving forward make sure the nodes can reach each other.
You can test basic connectivity with ping. You can also check interfaces and routes on the routers.
The key idea is simple:
Underlay first. Overlay second.
Step 4: Configure the SD-WAN Validator
The Validator was previously called Bond. It plays an important role during device onboarding and orchestration.
Cisco describes the Validator as part of the orchestration plane. It helps with device onboarding. Authentication. And NAT traversal.
Configure the Validator with the required information such as:
- Hostname
- IP address
- Organization name
- Certificate information
- Reachability to other SD-WAN components
The exact commands and configuration steps depend on the Cisco SD-WAN software version used in your CML lab.
After configuration verify that the Validator has working IP connectivity.
If the Validator cannot reach the other required components then device onboarding may not work correctly.
Step 5: Configure the SD-WAN Manager
Next configure the SD-WAN Manager.
The Manager is the central management system. It provides the main interface used to configure. Monitor. And maintain the SD-WAN environment.
Configure the basic information required by your software release. This can include:
- Management IP
- Hostname
- Organization name
- Controller information
- Certificates
- Authentication details
After the management service is ready open the Manager web interface.
From the Manager you can perform many SD-WAN tasks from one central location. Therefore you do not need to configure every branch separately for many common tasks.
Step 6: Configure the SD-WAN Controller
The SD-WAN Controller was previously known as Smart.
It is part of the control plane. The Controller helps distribute routing and policy information between SD-WAN devices.
Cisco documentation describes the control plane as the part that builds and maintains network topology. It also helps make decisions about traffic paths.
Configure the Controller so that it can communicate with the Manager and Validator.
Check the following:
- IP connectivity
- Organization name
- Certificates
- Controller status
- Control connections
Before moving to advanced policies make sure the basic control connections are working.
Step 7: Configure the SD-WAN Edge Routers
Now configure the two SD-WAN Edge devices.
You can use:
- Edge 1 for Branch A
- Edge 2 for Branch B
Each Edge should have a WAN interface. It can also have a LAN interface if your lab requires one.
For example:
Branch A
LAN: 192.168.10.0/24
↓
Edge 1
↓
WAN
↓
SD-WAN Fabric
↓
WAN
↓
Edge 2
↓
Branch B
LAN: 192.168.20.0/24
Give each Edge a unique hostname and IP address.
The Edge devices form the data plane of the SD-WAN architecture. They forward traffic based on control-plane information and policies.
Step 8: Establish SD-WAN Authentication and Certificates
Cisco SD-WAN uses certificates and secure connections between its components.
Therefore certificates are an important part of the SD-WAN bring-up process.
In a CML lab you must follow the certificate and onboarding method supported by the software version and CML image you are using.
Cisco CML documentation notes that Edge nodes need certificates generated and loaded into SD-WAN Manager before they can be bootstrapped.
If the certificates are not correct then the devices may have basic IP connectivity. However they may still fail to join the SD-WAN fabric.
For this reason check the certificate status before troubleshooting more advanced settings.
Step 9: Add SD-WAN Edge Devices to Manager
Once the Manager. Controller. And Validator are working you can onboard the Edge devices.
The exact workflow can change depending on the Cisco SD-WAN release.
The general process includes:
- First prepare the Edge device.
- Next add the required device information.
- Then verify the device identity.
- After that confirm the certificates.
- Next associate the device with the SD-WAN fabric.
- Then apply the required configuration.
- Finally check the control connections.
Cisco provides release-specific documentation for the SD-WAN bring-up process. Therefore check the documentation that matches your software version.
Step 10: Create the SD-WAN Overlay in CML2
After the Edge devices are onboarded you can build the overlay.
The overlay runs over the IP underlay.
This overlay allows branch devices to communicate through the SD-WAN fabric. As a result you do not need to manually configure every possible branch-to-branch route.
Cisco SD-WAN uses OMP to exchange routing information. It also uses centralized policies to help control traffic.
The overlay is an important part of the SD-WAN architecture because it connects the branch networks through the SD-WAN fabric.
Step 11: Configure SD-WAN LAN Routing
Now add the LAN networks behind the Edge routers.
For example:
Edge 1
LAN: 192.168.10.0/24
Edge 2
LAN: 192.168.20.0/24
Advertise the required LAN prefixes through the SD-WAN configuration.
The goal is to make the branch networks visible through the SD-WAN overlay.
Next test the connection between the branch networks.
For example you can test:
Ping 192.168.20.x
from a host or interface on Branch A.
If the overlay and routing are working then Branch A should be able to reach the correct network at Branch B.
Step 12: Verify SD-WAN in CML2
Verification is one of the most important parts of an SD-WAN lab.
First check basic IP connectivity.
Test reachability between:
- Manager
- Controller
- Validator
- Edge 1
- Edge 2
Next check the control connections.
Make sure the Edge devices have the expected control connections.
After that check OMP.
Verify that routing information is being exchanged correctly.
Then check the routes.
Look for the remote branch LAN prefixes.
Next check the tunnels.
Verify that the SD-WAN data-plane tunnels are established.
Finally test end-to-end traffic.
Try to send traffic between the two simulated branch networks.
If Branch A can communicate with Branch B through the SD-WAN fabric then your basic lab is working.
Common SD-WAN CML2 Problems
Sometimes the SD-WAN lab may not come online as expected. In that case start with the basics.
First check IP connectivity between the required devices.
Next check the certificates.
Then check the organization name and device information.
After that check the control connections.
Also verify that the correct CML SD-WAN images are being used.
If the basic underlay is not working then fix it before troubleshooting the overlay.
Remember the simple troubleshooting order:
Underlay → Certificates → Control Connections → OMP → Overlay → End-to-End Traffic
Final Thoughts on How to Build SD-WAN in CML2
Learning how to build SD-WAN in CML2 is a useful way to practice Cisco SD-WAN concepts in a virtual lab.
Start with a small topology. First build the underlay. Next configure the Validator. Then configure the Manager and Controller. After that onboard the Edge devices.
Finally build the overlay and test communication between the branch networks.
CML2 gives you a practical environment for learning SD-WAN architecture. It also gives you a place to practice configuration. Troubleshooting. Routing. Certificates. And centralized management.
As you gain experience you can expand the lab with more Edge devices. Additional branches. Advanced routing. And SD-WAN policies.